Track Guide Hungaroring
Budapest is one of the most tricky circuits. Many corners and none of them easy.
If you want, there already exists a video guide for the LFM License on Hungary, but we'll review it written here again.
The Qualifying lap we're looking at is from this Audi R8 Evo II data pack - a 1:42.295.
General
A total of 5 near 180° corners define this track. Yet, they differ in radius and want slightly different approaches.
The other defining sections are the chicane followed by the esses where each corner depends on the one before and the right compromise will be the key to lap time.
As always, track limits are rather wide and extending as much as it is allowed will allow you to carry more momentum onto the straights.
Corners
Turn 1
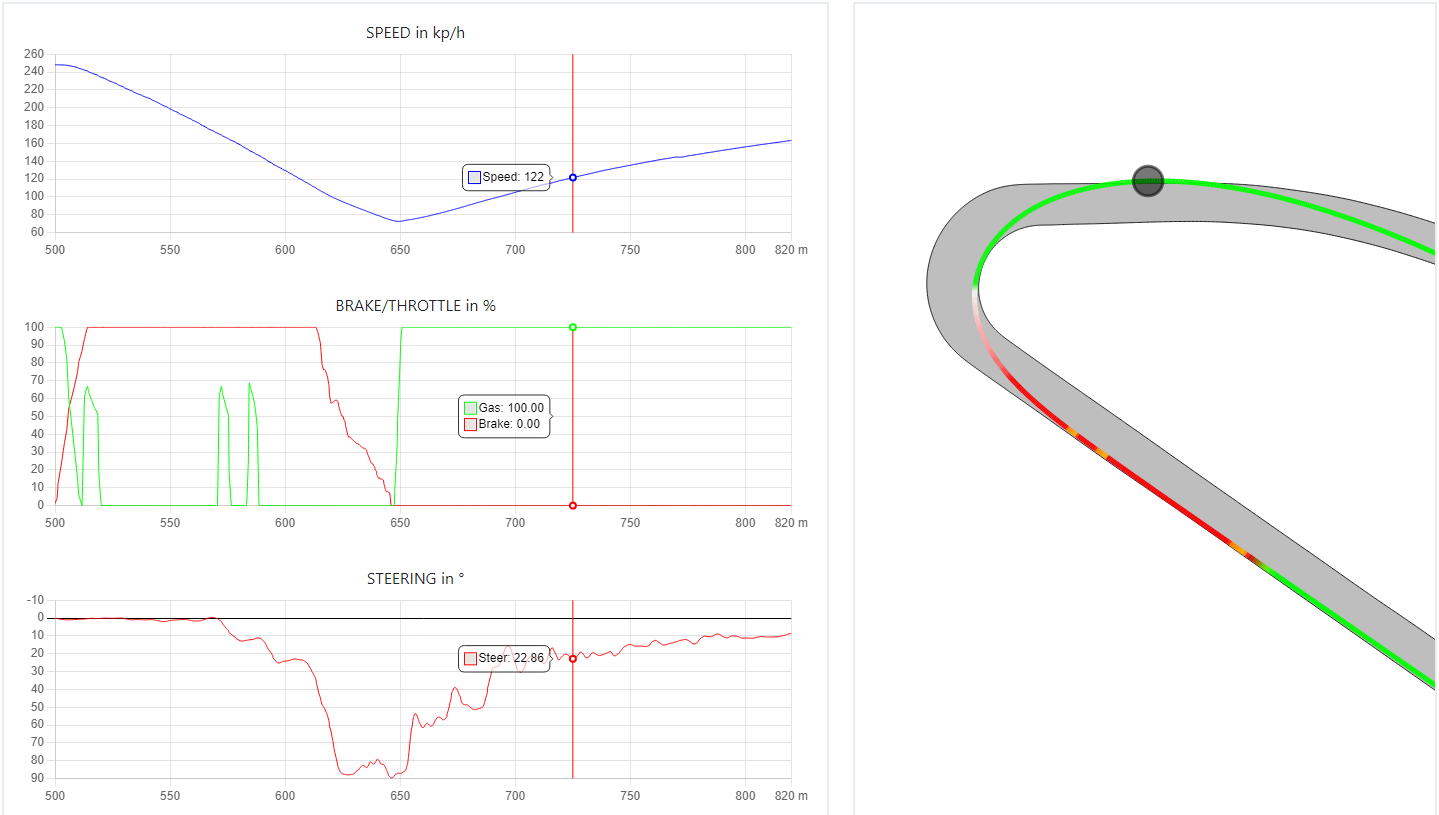
The first hairpin of the track wants a single apex approach, pretty much in the middle of the turn. The slowest point however is already slightly before the car is the most inside. This means the ideal way to drive is to be harsh on throttle here, which will bring the car further to the inside even while already increasing speed. Note that there's barely any coasting.
Trail braking is very important as the car will become rather slow without any downforce supporting the front grip in the late stages of braking. Roughly 30m out of the 145m braking zone are characterized by decreasing the brake in line with an increasing steering angle. 90° of steering are enough for most of the track. This will be even less with lower steer ratios.
Turn 2-3
Let's work this section backwards as those 2 corners are already connected - which means that the exit of turn 2 will define the entry of turn 3. The target is to smartly choose where to be fast and gain time. Here the smartest way is to be fast on the straight which means you need a good exit from T3, which means you want a wide entry - wide enough so that T3 is just about flat out!
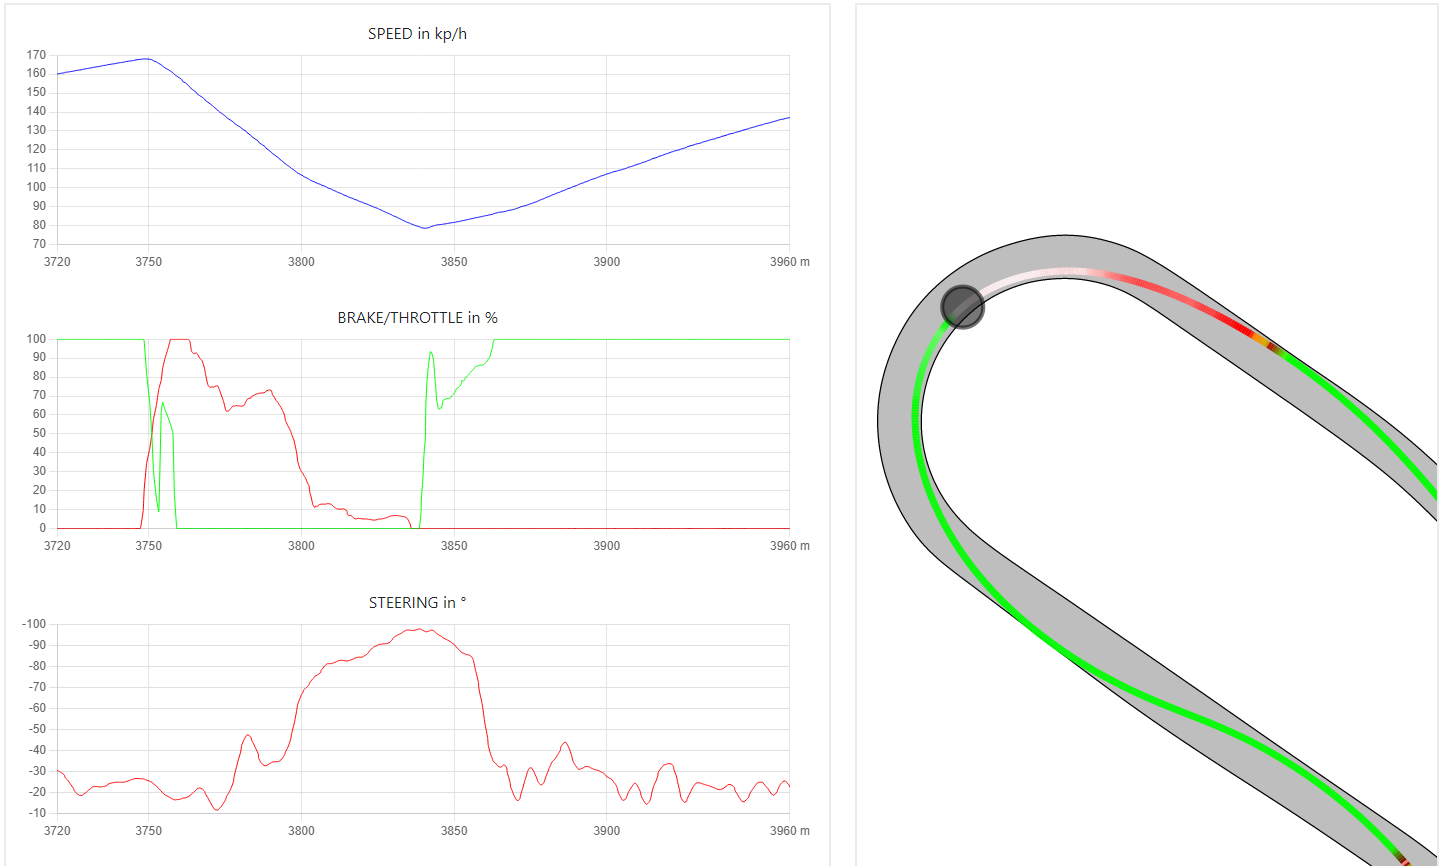
The problem is that there's very little time to reposition after T2. In order to still make it back to the left side of the track you cannot run wide out of T2. Instead the widest position after Turn 2 is pretty much the middle of the track. This now requires to be tight late in turn 2 - so a late apex. Because we have a very long turn 2 with almost 180° to cover we can do some sort of double apex. This means we will be tight early in the corner, run wide in the middle where we will also be the slowest and come back to the inside on throttle for the late, 2nd apex. Because we are slowing down so deep into the corner, the brake trace shows a much longer trailing phase than for T1 - pretty much 80% of the entire braking will be trailing as we require the front tires to be able to rotate the car already and are almost never braking in a straight line.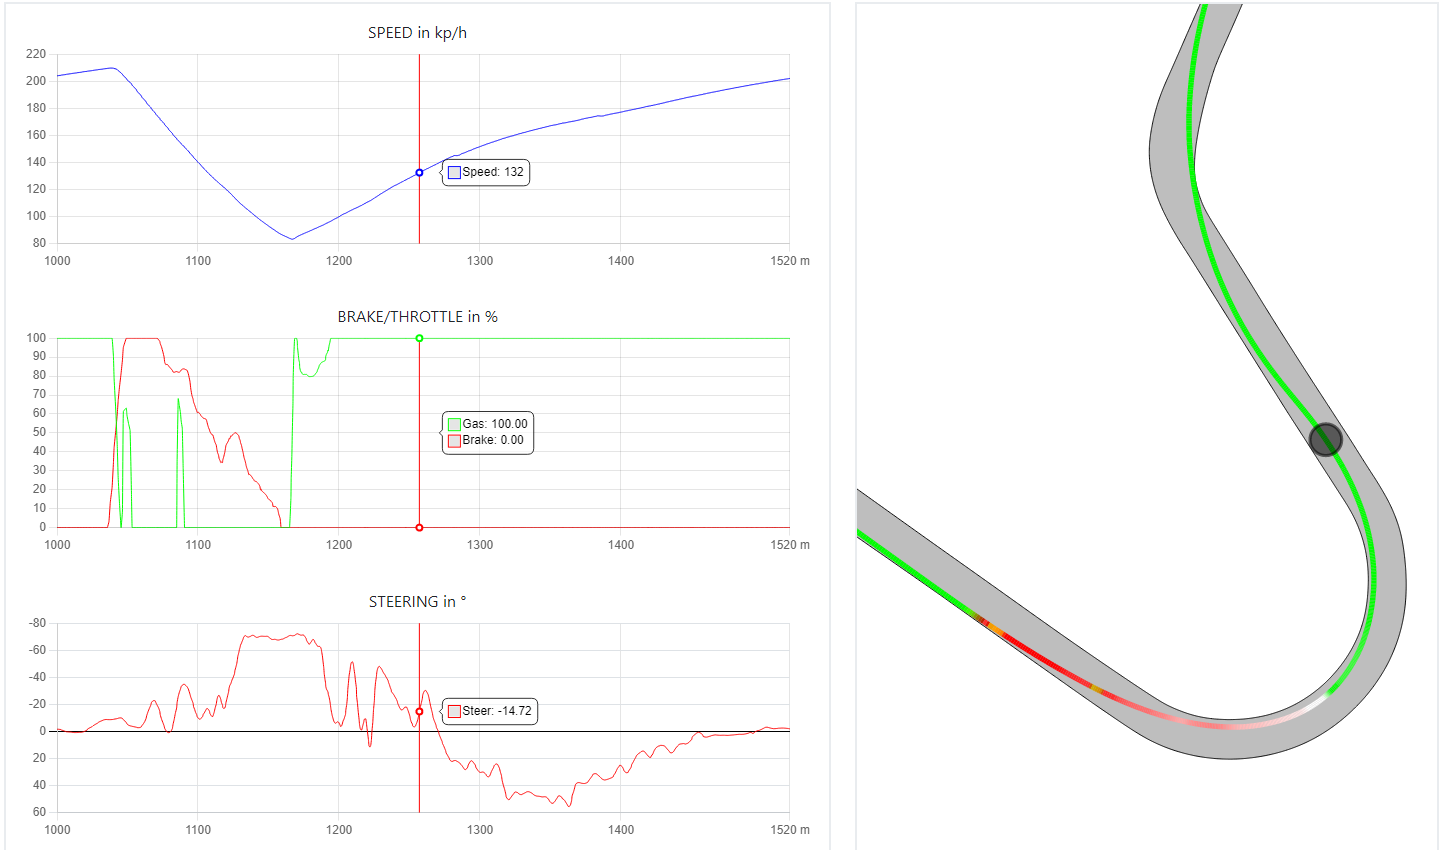
Turn 4-5
The same principal applies here: Little time to reposition for T5, so you need to be aggressive after T4 to make it across. Don't become lazy here. For T4 focus on the cone on the inside of the kerb while the kerb itself is still invisible - this way you'll have a good idea where you are heading. You can usually take the entire inside kerb. As the corner is rather fast, we don't want to brake deep into it and instead be done with braking before coming towards the apex and use the throttle to stabilize the car. You'll also need to be aggressive to keep rotating it.
Turn 5 starts with a very short straight braking phase followed by long trailing that itself is split up into the initial brake release phase and the very low level brake holding into the turn until the inside line finally provides grip. There is absolutely 0 grip on the outside. We are looking at an apex that is last third of the turn, while the slowest point is already after one third of the corner. Due to the wide track limits the corner opens up, allowing us to accelerate quite early. However, the bumps will challenge the rear and this is where you can see a bit of taking care with the throttle after an initial aggressive throttle kick to start the car's rotation.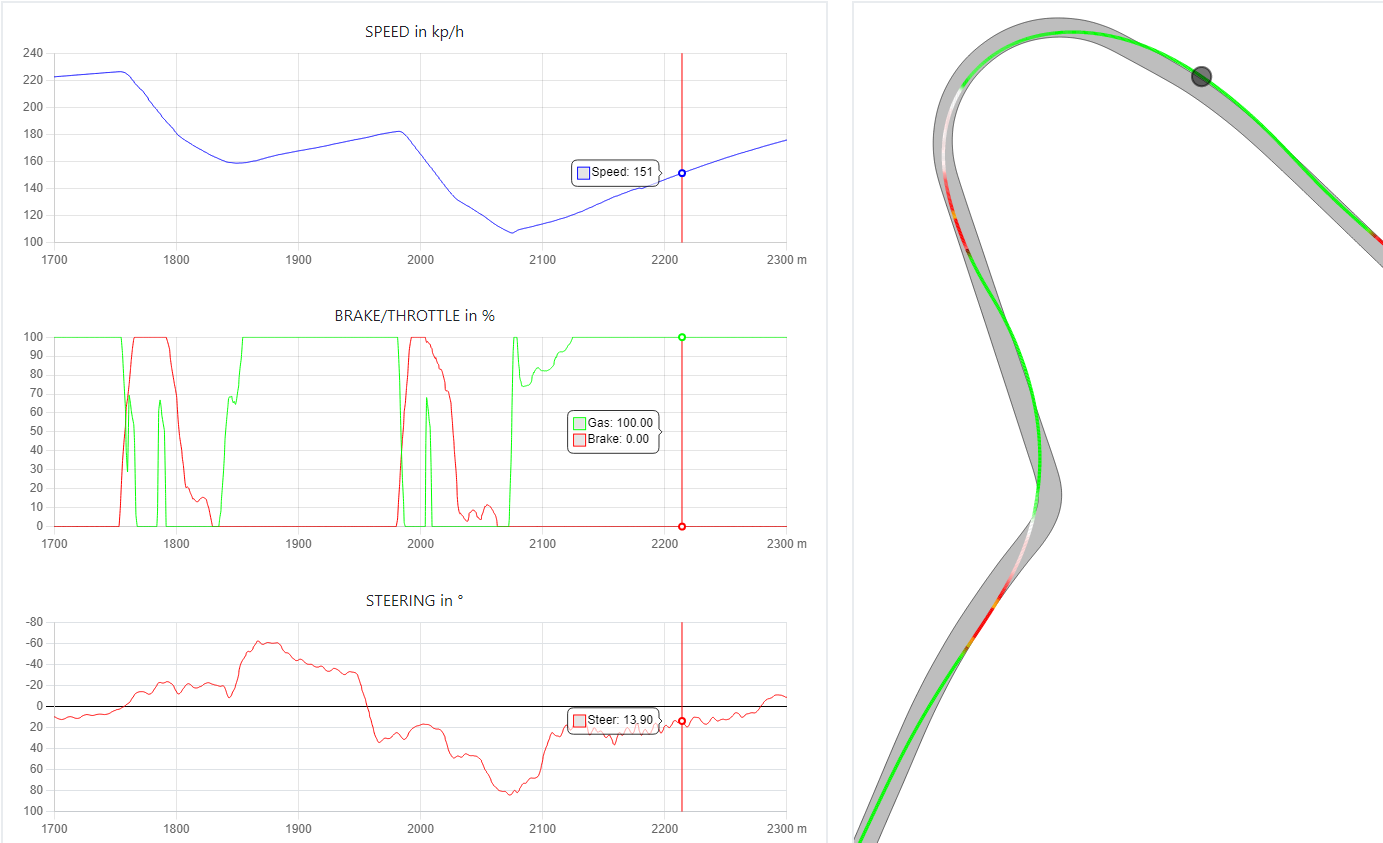
Turn 6-7 (Chicane)
The most crucial info here is that you are done braking before the first kerb and immediately back on throttle to lift up the nose and allow the car to fit the sausages underneath you. This means the slowest point in that corner is before the corner. The track limits are very lenient here and the entire car can be on the kerb. This will need a few attemps to get a feeling where the sausage needs to be placed under the car, but once you get the hang of it, there's a ton of lap time. The 2nd kerb is less flat but there's a way to fit this sausage, too. You need to be on throttle, once you lift the throttle or brake the car will crash into the sausage. Additionally the throttle provides stability while the car is bouncing.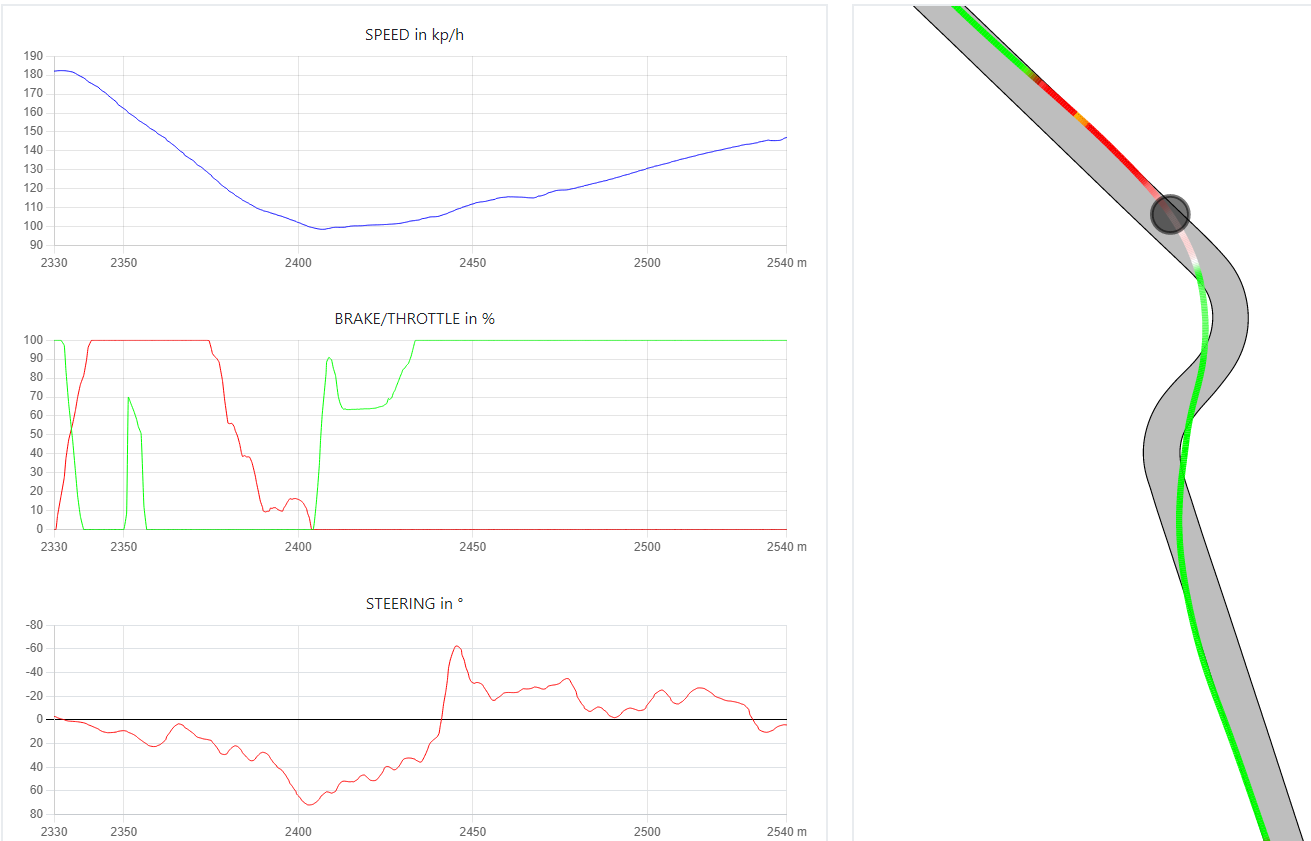
Turn 8-11 (Esses)
Take a close look at the compromises. The apexes are always in the middle of each turn, while the slowest point is only in the middle in t8, but before the corners of t9 and t11. The most important compromise is to not run wide after turn 8 (similar to turn 2), in order to rather have a wide entry and good exit in turn 9 out of which you need to carry the speed more importantly than out of 8. Only very little braking (and all of it low level trailing) will be needed if you positioned correctly. While the kerb of 8 can be used, turn 9 has a more tricky kerb. If you use it, try to climb up to the flat part on top, else the angled part will push the car out of the corner (you won't always manage that, just be aware of the impact the different parts of the kerb will have on the car). On exit of 9 the track limits again are very wide which allows to build much more speed.
The turn 10 kink is important, too. Don't run too wide here and it can be beneficial to be very quick with the steering into 10 in an attempt to force the rear around, using the kerb additionally helps to rotate the car and be back on the outside quickly before braking for 11. Again exit of 11 is the important part, as a straight follows afterwards. A short sharp braking while changing direction (this will help to get the rear to come around) followed by a bit of coasting and potential corrections on either brake or throttle are very typical and ok here. Rather carry slightly too much speed initially and use the brake again in small doses to pull the car further to the inside. Once you notice the car will get to the very inside of the kerb, slam the throttle to exploit the additional rotation coming from the kerb.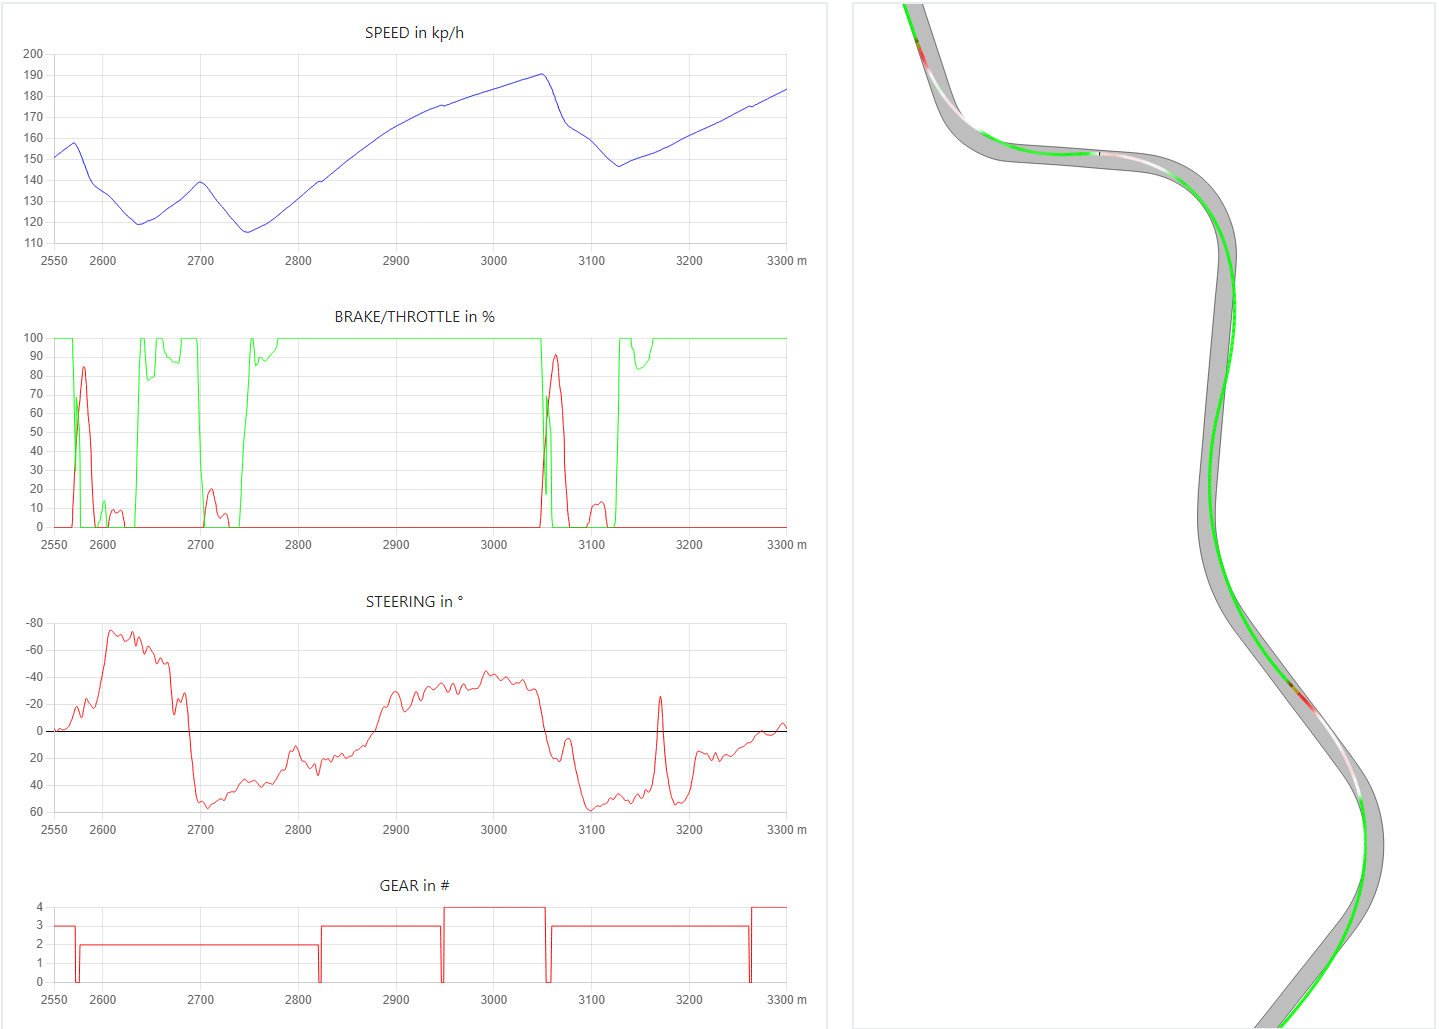
T12-14
The last 3 corners are more or less individual. Again T12 has the apex placed right in the middle, you can use or avoid the kerb - both ways are fine. Just be sure the slowest point is already before the turn and the track on exit again is really wide.
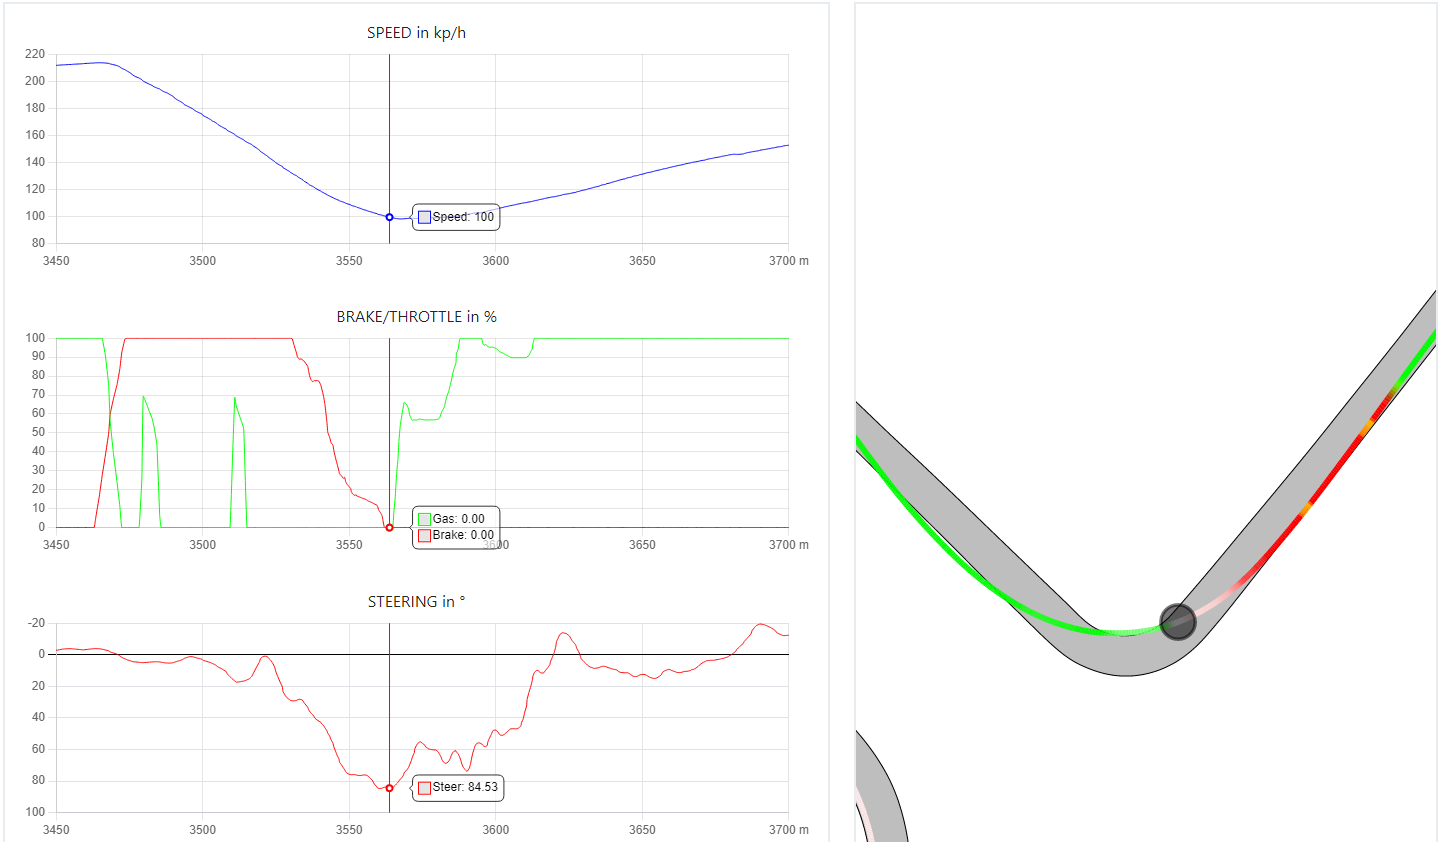
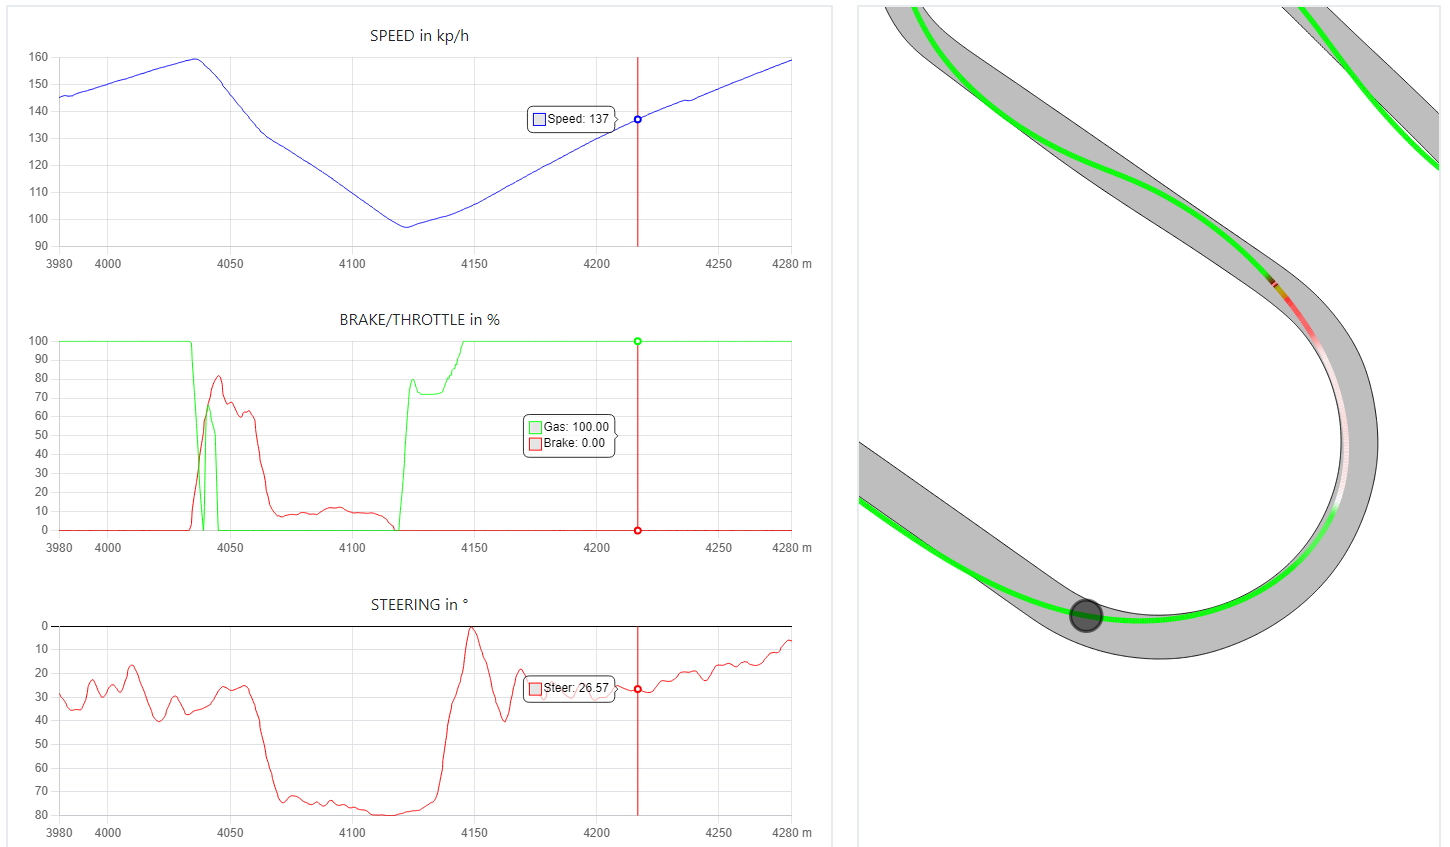
Turn 13 needs a slight double apex (don't go too wide in the middle), very similar to turn 2. The only difference is that you can run wide on exit as there's more time to reposition for the last corner (but don't get lazy doing so).
 Turn 14 however is a bit faster (about 20kph more than T13) and on entry downforce already plays a role, which makes the car rather pitch sensitive. The initial sharp braking will be challenging as the rear tries to step out, so small steering angles are needed here. It helps to almost diagonally brake towards the first early apex and then trailing VERY carefully until about the middle of the turn, where you will run ever so slightly wide, before coming back onto the throttle to pin the car to the inside and accelerate through the 2nd, late apex. Track limits again wide and then you're done - hopefully faster than before this guide!